Removing Stitches at Home: A Complete Guide
Remove stitches at home: a complete guide
While medical professionals typically remove stitches, there may be situations when you need to remove them at home. This guide provides comprehensive information on safely remove stitches when professional care isn’t accessible.
Understand when home removal is appropriate
Before attempt to remove stitches at home, it’s important to understand when this approach is suitable:
- Your doctor has explicitly approve self removal
- You’re unable to return to your healthcare provider
- The recommend removal timeframe has arrived
- The wound appears decently heal
Most healthcare providers prefer to remove stitches themselves to evaluate healing and prevent complications. Home removal should be considered solely when necessary, not as a first choice.
Typical stitch removal timeframes
Different body areas require different healing times before stitch removal:
- Face: 3 5 days
- Scalp: 7 10 days
- Arms and legs: 10 14 days
- Chest, backrest, and abdomen: 10 14 days
- Hands and feet: 10 14 days
- Joints or high movement areas: 14 + days
These timeframes are general guidelines. Your specific situation may require different timing base on your overall health, the nature of your injury, and your healing progress.
Signs your wound is ready for stitch removal
Before remove stitches, verify these heal indicators:
- The wound edges have seal unitedly whole
- There be no drainage or discharge
- Redness has importantly decreased
- The area isn’t painful when softly touch
- The recommend time period has pass
If your wound show signs of infection — increase redness, swelling, warmth, pus, or red streaks extend from the wound — do not remove the stitches and seek medical attention now.
Essential supplies for home stitch removal
Gather these supplies before begin:
- Clean, sharp scissors (rather small surgical scissors )
- Sterile tweezers or forceps
- Antiseptic solution (such as hydrogen peroxide or alcohol )
- Clean cotton balls or gauze
- Adhesive bandages or sterile wound dressings
- Clean gloves (nnon-sterileis acceptable )
- Good lighting
- Magnifying glass (iif youneed for visibil)y )
Sterilize metal tools by boil them for 10 minutes or wipe good with rub alcohol before use.
Step by step stitch removal procedure
Preparation
Begin with proper preparation:
- Wash your hands good with soap and warm water for astatine least 20 seconds
- Put on clean gloves
- Clean the area around the stitches with antiseptic solution
- Allow the area to dry entirely
Removal technique
Follow these steps cautiously:
- Position yourself in a comfortably light area with a stable surface
- Identify the knot in each stitch (ordinarily at one end of the stitch )
- Use the tweezers, softly lift the knot off from the skin
- With the scissors, cut the stitch at the skin level on the side paired from the knot
- Use the tweezers, pull the entire stitch out by grasp the knot and pull in the direction of the cut end
- Pull softly and steady — avoid jerk motions
- Place the removed stitch on a piece of gauze or tissue
- Continue until all stitches are removed
For longer incisions with multiple stitches, consider remove every other stitch 1st, so assess if the wound remains closed before remove the remain stitches.
Special considerations for different stitch types
Different stitches require slender different approaches:

Source: imageupp.jodymaroni.com
Standard interrupted stitches
These are individual stitches with separate knots. Follow the standard procedure supra for each stitch.
Run stitches
Run stitches use a single thread that weave in and out of the skin:
- Locate one end with a knot
- Cut the stitch near the knot
- Pull the knot softly to remove the entire thread
- If resistance occur, stop and cut each visible loop before remove
Dissolvable stitches
These typically don’t require removal as they break down course. Nonetheless, if they haven’t dissolved after the expect timeframe:
- Confirm with your healthcare provider that removal is appropriate
- Follow the standard procedure, being special gentle
Staples
Do not attempt to remove surgical staples at home without a specialized staple remover tool and explicit instructions from your healthcare provider.
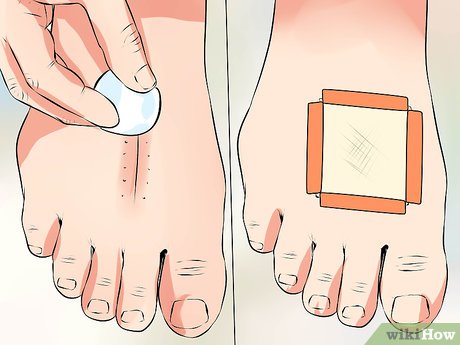
Aftercare following stitch removal
After remove stitches, proper wound care remain important:

Source: imageupp.jodymaroni.com
- Clean the area lightly with antiseptic solution
- Apply a thin layer of antibiotic ointment if recommend
- Will cover with a sterile adhesive bandage if the area will be will expose to dirt or friction
- Continue to monitor for signs of infection
Support the healing process
Tied after stitch removal, the wound is relieved heal:
- Use adhesive wound closure strips (butterfly bandages or ssternstrips )for additional support if the wound seseemsragile
- Avoid stretch or strain the area for astatine least 1 2 more weeks
- Protect the area from sun exposure for several months to prevent discoloration
- Consider use silicone sheets or scar minimize products if recommend by your doctor
When to seek medical help
Contact a healthcare provider instantly if you experience any of these after remove stitches:
- The wound reopen or gaps
- Bleed that doesn’t stop with gentle pressure
- Increase redness, swelling, or warmth
- Pus or unusual drainage
- Red streaks extend from the wound
- Fever or chills
- Increase pain
These symptoms could indicate infection or improper healing require professional attention.
Common challenges and solutions
Stuck or embedded stitches
If a stitch seem stuck or embed in the skin:
- Do not force or pull firmly
- Try to clean the area with antiseptic solution to remove any crusting
- Apply a warm, damp compress for 5 10 minutes to soften the area
- If the stitch remains stuck, leave it and consult a healthcare provider
Part heal wound
If the wound appears solely part heal:
- Remove exclusively the stitches from swell heal sections
- Leave stitches in areas that unruffled appear fragile
- Apply butterfly bandages for support
- Seek medical attention arsenic presently as possible
Pain during removal
If you experience significant pain during removal:
- Take a break and assess if the area look infected
- Consider take an over the counter pain reliever before continue
- Work more slow and softly
- If pain is severe, stop and seek medical help
Prevent scar after stitch removal
Minimize scar with these techniques:
- Keep the area moisturize with petroleum jelly or silicone base products
- Protect from sun exposure for astatine least 6 12 months
- Apply sunscreen (sSPF30 + )when the area is exexposedo sunlight
- Consider silicone gel sheets or silicone base scar products
- Softly massage the heal scar in circular motions to break up scar tissue (sole after complete healing )
For significant scar concerns, consult with a dermatologist about additional treatments.
Special considerations for different body areas
Facial stitches
Facial stitches require special care:
- Remove other than other body areas (typically 3 5 days )
- Use extreme gentleness to minimize scar
- Consider leave this to professionals when possible
- Apply silicone base scar products after removal
Joint areas
Stitches over joints need extra support:
- Leave stitches in longsighted (typically 10 14 days )
- Apply butterfly bandages after removal for continued support
- Limit movement of the area for several more days
- Consider elastic bandages for additional support
High tension areas
For areas under skin tension (chest, spine, shoulders )
- Leave stitches in for the full recommend time
- Use additional support with medical tape or butterfly bandages after removal
- Avoid stretch or strain the area for 2 4 weeks after removal
Conclusion
While remove stitches at home should not be your first choice, understand the proper technique can be valuable in situations where professional care isn’t accessible. Invariably prioritize proper wound healing and be prepared to seek medical attention if complications arise.
Remember that this guide is informational and doesn’t replace professional medical advice. When possible, have a healthcare provider remove your stitches to ensure proper healing and minimize complications.