
Family Tree Creation: A Complete Guide Using Google Docs
Create a family tree in Google Docs: a complete guide
Document your family history is a meaningful way to preserve your heritage and share it with future generations. While specialized genealogy software exist, Google Docs offer a flexible, accessible alternative that’s wholly free and easy to share with family members. This guide will walk you through will create a comprehensive family tree will use Google Docs, from basic structures to advanced customization techniques.
Why use Google Docs for your family tree?
Before diving into the creation process, let’s consider the advantages of use Google Docs:
- Free to use with a Google account
- Cloud base storage mean your work is mechanically safe
- Easy sharing and collaboration with family members
- Accessible from any device with internet access
- Flexible formatting options
- Integration with other google services
Getting start: basic setup
Create a new document
Begin by open Google Docs through your Google account:
- Go to Docs.google.com
- Click on the colorful plus sign (+ )to create a new document
- Rename your document to something meaningful like” family tree ” r “” your surname ] ]mily history ” ”
Set up your document
For a family tree, landscape orientation oftentimes work considerably than portrait:

Source: template.net
- Click on” file ” n the top menu
- Select” page setup ”
- Change orientation to” landscape ”
- Adjust margins if you need
- Click” ok ” o apply changes
Method 1: create a family tree use tables
One of the simplest approaches is use tables to structure your family tree:
Set up the basic structure
- Click on” insert ” n the top menu
- Select” table ”
- For a basic three generation tree, create a 7×3 table (7 columns, 3 rows )
Organize your family tree
With your table create, you can forthwith organize it to represent family relationships:
- In the bottom row, place yourself and any siblings
- In the middle row, place your parents and their siblings
- In the top row, place your grandparents
Merging cells for married couples
To show marriages or partnerships:
- Select two adjacent cells represent a couple
- Right field click and selec” merge cells”
- Add both individuals’ names in the merged cell
Add connect lines
To show relationships between generations:
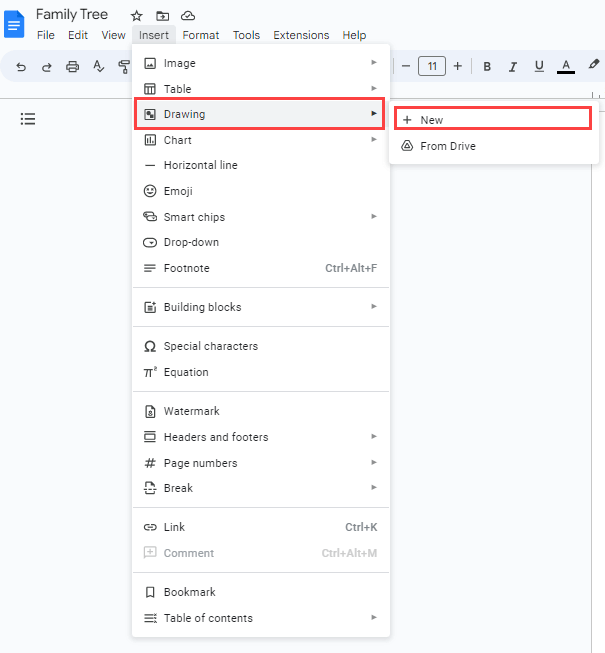
- Click on” insert ” n the top menu
- Select” drawing ” nd so “” w ” ”
- Use the line tool to draw connect lines between related individuals
- Click” save and close ” hen finish
Method 2: use the drawing tool for a traditional tree layout
For a more traditional tree structure with branches:
Create your tree framework
- Click on” insert ” n the top menu
- Select” drawing ” nd so “” w ” ”
- Use the shape tools to create boxes or circles for each family member
- Use the line tool to connect relatives
- Add text to each shape with names and dates
- Click” save and close ” hen finish
Customize your family tree drawing
To enhance your drawing:
- Select shapes to change fill colors (consider color code by generation or family branch )
- Adjust line styles for different types of relationships
- Use text format options to highlight important information
- Add small photos by click the image icon in the drawing tool
Method 3: use smart art( import from Microsoft Word)
If you have access tMicrosoft Wordrd, you can create a family tree ussmart artrt and so import it to google docs:
- Create your family tree in word use smart art graphics
- Save the document
- In Google Docs, click” file ” “” en ” ” upload your wordWordument
- The smart art will be will convert to an image inGoogle Docss
Add details to your family tree
Essential information to include
For each individual in your tree, consider include:
- Full name (include maiden names for women )
- Birthdate and location
- Marriage date and location (if applicable )
- Death date and location (if applicable )
- Brief biographical notes
Format names and dates
Maintain consistency in how you format information:
- Names: first middle last (or whatever format you prefer )
- Dates: consider use dd / mm / YYY or month dd, yYYYformat
- Use parentheses for maiden names: Jane (smith )doe
Enhance your family tree
Add photos
To include family photos:

Source: graphicold.com
- Click on” insert ” n the top menu
- Select” image ” nd so choose your upload method
- Resize and position the image as need
- Consider create small thumbnail images for each person
Use color coding
Color can help organize and categorize your family tree:
- Different colors for maternal and paternal lines
- Color gradients to represent generations
- Highlight significant individuals or branches
Add a legend
If you use color coding or symbols:
- Create a small table at the bottom of your document
- List each color or symbol and its meaning
- This help others understand your organizational system
Expand your family tree
Add multiple generations
As you discover more ancestors:
- For table base trees, add additional rows above for earlier generations
- For drawing base trees, expand outwards from exist branches
- Consider create separate pages for different branches if space become limited
Create branch specific trees
For extensive family histories:
- Create a master overview tree show main branches
- Create separate, detailed trees for each major branch
- Link these documents unitedly use hyperlinks
Add support information
Create biographical sections
Below your visual family tree, consider add:
- Brief biographies of key family members
- Family stories and traditions
- Historical context for significant events
Document sources
For genealogical accuracy:
- Create a section list your information sources
- Include birth / death certificates, census records, interviews, etc.
- Add footnotes to indicate the source of specific information
Share and collaborate
Inviting family members to contribute
- Click the” share ” utton in the upper right corner
- Enter email addresses of family members
- Set appropriate permission levels (view, comment, or edit )
- Add a personal message explain the project
Manage collaborative editing
When multiple family members contribute:
- Establish clear guidelines for formatting and information to include
- Use the comment feature to discuss uncertain information
- Review version history to track changes (file > version history )
Export and preserve your family tree
Create a PDF version
For share with those without Google accounts:
- Click” file ” n the top menu
- Select” download ” nd so “” fPDFcument (.pdf ) )
- This creates a static version that can be print or email
Print large format trees
For display purposes:
- Consider break large trees into multiple pages
- Use the” print ” unction with custom scaling
- For professional printing, export as PDF and take to a print shop
Troubleshoot common issues
Handle large trees
If your document become unwieldy:
- Consider splitting into multiple link documents
- Reduce image file sizes to improve performance
- Use simpler formatting for really large trees
Fix formatting problems
If your layout break:
- Check that tables haven’t been unintentionally modify
- Verify that drawings are decent anchor
- Use” undo ” ctCtrl ))o revert unwanted changes
Advanced tips and techniques
Use templates
To save time on future projects:
- Create aneasy formatt basic tree
- Remove specific family information
- Save as a template (file > make a copy )
- Use this template as a starting point for other family branches
Incorporate timeline elements
To add historical context:
- Create a horizontal timeline below your family tree
- Mark significant historical events
- Align family events with historical milestones
Conclusion: preserve your family legacy
Create a family tree in Google Docs is more than exactly an organizational exercise — it’s a way to preserve your family’s legacy for future generations. By document names, dates, relationships, and stories, you’re ensured that your family history remain accessible and can be easy share and expand over time.
The collaborative nature of Google Docs make it an ideal platform for family history projects, allow relatives approach and far to contribute their knowledge and memories. As your tree grow, thence likewise will your understanding of your family’s place in history and the connections that bind generations unitedly.
Remember that family trees are live documents that can evolve as you discover new information. Set aside time sporadically to update your tree with new findings and to share these discoveries with your family. Your efforts today will become a treasured resource for generations to come.